
 They are all on order and hopefully we will have them in stock by March 1st! They are available only in Sketch markers. I have not heard about refills, but I am sure that they are also coming.
Jeannette
They are all on order and hopefully we will have them in stock by March 1st! They are available only in Sketch markers. I have not heard about refills, but I am sure that they are also coming. Sorry for the extreme delay in posting - just don't know where the time went! Trying to get everything ready for Christmas really ate up all my free time. This is a holiday thank you card made with a cardinal image from Flourishes. I love this artist! Her designs are so realistic and they stamp beautifully. I stamped the image on white with black momento ink and colored with Copic markers. Then I layered it to a lacey circles die cut. Add a couple fancy layers, stamp a thank you and you're done!
 This wonderful image is from Art Impressions and features their fun little penguins geared up for a sleigh ride. If they are in the Northeast, they are in trouble, as we have had unseasonably warm weather - near 50 for the past week! Unheard of in these parts a week before Christmas! I started by stamping the image with black Momento ink and coloring with Copic markers. I did not color each section completely and left a little white space. The DP is from We R Memory Keepers - not even a holiday paper, but it works well with the card! I added some purple snowflakes and attached some Candi dots over them. These are fun little adornments and you get a ton in a package! Add some ribbon and you have a great little card!
 Starts with a blue theme with silver trim. A very elegant look to Tilda.
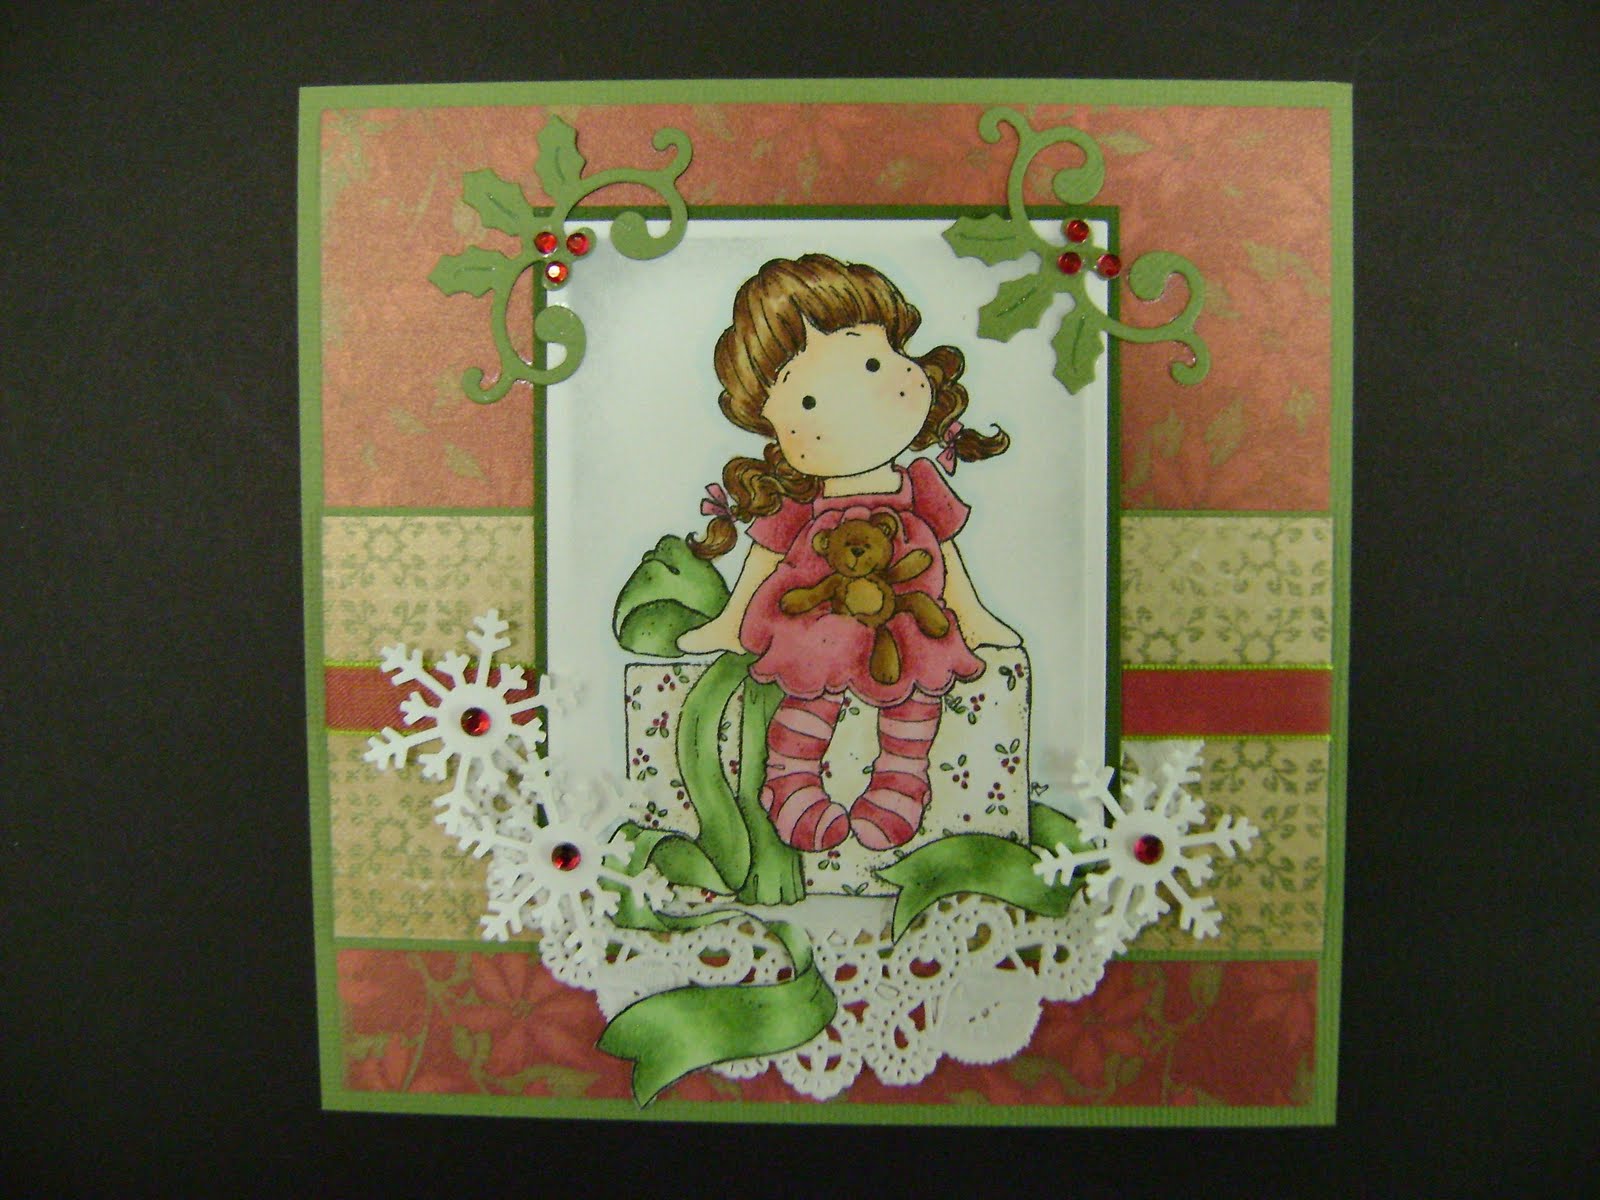 This one is little Tilda with a teddy bear, cut out and sitting on a holiday box. I like the more traditional Christmas colors on this one. I also like the Spellbinders holly accents dies with a little bling!
 Lastly is Tilda with a snow heart - not the most holiday themed design, but I really like this image. This one was colored using Ranger's Distress re-inkers as a watercolor. You cannot tell from the photo, but Tilda was stamped and cut out, then layered over the die cut piece.
 This is one of those cute bunnies from The Cat's Pajamas! if you are a skier - or know someone who is, this is a great image that you can have a lot of fun with. On this card, I stamped the bunny on white CS with Memento ink and colored with Copics. Then, I cut it out. That is the true challenge of this card! Once you get that done, the rest is easy-peasey! The little snowflake corner in the left corner is a Memory Box die - embellished with glitter from Elizabeth Crafts Design. To do this, I adhered a piece of BeCreative tape to a piece of copy paper (the stuff you use in your computer printer). Then I cut it out with the die cut. Note, I tried this with cardstock and could not get a clean cut. The paper worked fine. Then you carefully remove the adhesive backing sheet and dip the piece in EC glitter - the glitter adheres to the adhesive. Brush off any excess. Then add a few dots of Ranger's Glossy Accents to the back and carefully adhere it to your card. The bunny is attached with foam tape. Enjoy!
 Nothing like a tasty Christmas cupcake! This is an Elizabeth Crafts peel-off - attached to a piece of white cardstock, the painted with USArtQuest mica paints (everything except the frosting, that is!). The glitter layer on the card is made by taking a piece of the wide "Be Creative" tape and attaching it directly to the green card front and then covering with Elizabeth Crafts glitter (this is the finest glitter I have ever seen). Then it is simply a layering game. After I got it all layered, I added some Crystal Stickles to the frosting part of the cupcake.
 For everyone who battles the middle age bulge, this is the card for us! I love the image and the saying! These stamps are part of a cling mount set from Art Impressions. Stamped in Momento ink and colored with Copic markers. Layered up with some fun shapes, a few flowers and some pearls!
 Well, this is one way to turn your cats into ornaments! I started with 2 pictures and a Spellbinders circle die. Made to "ornaments" with the pictures and stamped some pine branches on the cardstock base, then used a gold twine from May Arts to "hang" the ornaments. The girls like being festive!
 Where did the week go? I cannot believe it is Friday all ready, but it is! Only 3 weeks until Christmas and it seems like we just finished summer. Oh well. Father Time is not slowing down, that is for sure. Today I used another stamp from a Heartfelt Creations snowman stamp set that I used on a previous post. This time, I stamped the image on kraft cardstock with VersaFine ink and colored the snowman with Prismacolor pencils. This way you can use a white pencil for the actual snowman. I also used a Tim Holtz on the edge die to make the snowflake trim at the bottom of the card. Definitely creates a different look. I hope everyone is doing well getting ready for the holidays. I have 70 cards done - 40 more to go!
 This is one of the new stamps in the latest Magnolia collection. I tried coloring the dress several ways - white was too boring, red tot bold for what I wanted to achieve. I really wanted an ivory, but struggled with my Copics trying to achieve that color. This is what I ended up with. Not exactly what I wanted... I went for blonde hair this time, as there was enough brown and I like the red hair bows. After coloring and adding a couple layers, I made a bow with a wonderful crinkle ribbon from Creative Impressions. I LOVE this ribbon. Ties like a dream and is soft as butter! I added another bow from a gold twine from May Arts. This is another product I love to use! Lastly I added a couple gold Dew Drops to the front. Sorry for the posting delay. We've had a couple minor crisis going on and then the holiday. Hopefully things will return to their normal craziness and we'll be back to regular posting. Thanks for your patience!
 When it comes to cute, there are 2 companies that I tend to turn to...Whippersnapper and Penny Black. Today it is Whippersnapper. Who can resist a cute bear on a hobby horse? Not me! I stamped the image with Momento ink and colored with Copic markers. Cut out with a Spellbinders oval and layered to a scallop oval in red. To make the card, layer the "Peace & Joy" print paper to a red layer, then add the flat ribbon piece. Layer to the base card, then attach the image piece and add the tied bow with a glue dot. Add a couple punched snowflakes layered with a couple colored dots.
 I know that by the calendar, this is a little out of season, but we have been having some unseasonably warm weather here in the northeast - hopefully that will mean a mild winter, but I doubt that the 2 are related. Back to the card...I used a set from My Favorite Things and this is a paper-piecers dream! You start by stamping the image on white cardstock with Momento ink. Then I stamped the dress part of the image on the floral print cardstock and the hair part of the image on a piece of tan cardstock and cut out the dress and her hair. First you attach the dress piece to your white stamped image, and then the hair. I like to use Ranger's Glossy Accents, which is my favorite "small piece adhesive." I use it for big pieces, too, but I LOVE it for the little ones. I also stamped the corner of her dress on pink and cut out the little heart and added that. Now you can color the rest of the image with Copics and the words on a strip of pink Bazzill. The striped DP paper is the reverse side to the floral print that makes up her dress. I added a couple butterflies above her with some pearls and you're done!
 This card uses one of the new Christmas sets from Flourishes. The set contains some holiday silhouettes and I really like this one with the kids trimming the tree. I stamped the image with black Versafine ink, cut it out with a Spellbinders circle die, then only colored the skirt of the little girl with red and green Copic markers. You can use Versafine with Copics if you are careful not to run the pen over the ink. In this case, I stamped it a couple days ago, so the ink had completely dried. I would not do any heavy blending with this ink, but I prefer it for stamps like this as I think it gives a superior image. Then I went around the edge with Ranger Wild Honey Distress ink. Wild Honey is truly one of my favorites - I use it a lot. Sometime by itself and sometimes over a brown first layer - as it "warms it up." I stamped the words next, over the distress ink. Then I layered it to a green scallop layer and used a red and kraft harlequin paper from Canvas Corp for the main background layer. Add a red and green ribbon from May Arts and some little red crystals from Memory Box to give it a little bling, and you're done!
 This morning before breakfast we looked out in the back yard and noticed that 2 bird feeder poles were on the ground - the one was a metal pole arrangement, which we have had for years. The other was a 4x4" wood post put into the ground - and he (or she) just pulled that right out of the dirt. Yes, we have had enough rain here, but it still takes some force to get that down. I guess someone was hungry. Time to take the feeders in at night until they start hibernating, I guess. I asked the cats if they heard or saw anything, but they are not talking!
 The cats by Penny Black rubber stamps are some of my favorite images. I guess that is partly because I am a cat fan - especially tabby cats! And this cat is a smart cat and has started her Christmas shopping early! I stamped the image with Versafine ink and colored it with Staedtler watercolor pencils and a Dove blender pen. I layered some blue Bazzil cardstock underneath and stamped some words from Hero Arts. The ribbon bow hides the cardstock line. Layered to some DP and a base card to create a fun holiday card!
 I just love Flourishes stamps! Besides the great artwork, the other thing I love about them is the quality of their clear rubber! It is the only company whose clear rubber stamps beautifully the first time, and every time - and gives a result that I cannot distinguish from red rubber. And I am a big fan of natural red rubber, so that is saying a lot! Okay, back to the card. This uses their waterlily set and the waterlily image is stamped with back Momento ink, colored with Copics and cut out. I took a Spellbinders label die and cut and embossed the cardstock. Before removing it from the die, I edged it with Ranger Distress ink. I find the Distress ink is the best ink for this effect. The fact that it stays wet a bit longer seems to allow it to blend over the cardstock easily and gives wonderful results. I stamped the words next, using VersaFine ink. The DP is from BoBunny and I added some crochet ribbon from May Arts with some beige double-face satin over the top tied in a square knot. Add a couple layers, a few pearls and you're done!
 We got this cute polar bear card and all the fixin's to make it this week! You have to love the little guy! There is the stamp and a matching die to cut him out if you prefer. The snow globe is also a die cut! Add the north star die and the cute polar bear paper and you have a great card!
 Use "Evergreen Bough, Festive Berries and Iced Spruce" to your holiday creations this year. They are here and when they're gone, they're gone!
 We keep hoping for power to be restored at our house... No luck yet! You can always stamp - just cannot emboss!

 This a simple card that uses an interesting resist technique. I started with a solid butterfly image from Impression Obsession. I inked the stamp with clear embossing ink and randomly stamped it on a piece of printed paper. Cover with clear embossing powder, shake off the excess and heat emboss. Then I took Dusty Concord Distress ink from Ranger and using a foam applicator, applied the ink over the piece. The embossed images will resist the ink. Take a tissue or paper towel and rub to remove any stray ink off the embossed designs. The words are from Flourishes and I went around the edges of the oval with the Dusty Concord ink, as well. Add some ribbon and layers and you have a great card.
 Well, what do we think of when we think of November? Thanksgiving! And what is Thanksgiving all about? Yes, FOOD! So, November's calendar page is the 2 girls with their faces in the food bowl! This is a simple page - the background is a beige cardstock with some Fall leaves stamped on it in brown, then a couple strips of a coordinating cardstock added across it. The picture is cut out with a Spellbinders label die and I added a few gold pearls for accent. Enjoy!
 I love the Fall! The colors can be so stunning, sometimes the trees look like they are on fire. It has not been a stunning year here in the Northeast for foliage, but some of the trees are looking lovely. This card is made using a background technique and a beautiful Lockhart stamp. To make the background piece, I started with lightweight watercolor paper and stamped an Impression Obsession large background stamp with pigment ink and embossed in gold. Then I took some of the Ranger Distress Stains and applied them to the cardstock, then misted with plain water. The water reacts with the stains and blends the colors together. The wreath image was stamped with VersaFine ink and colored with Prismacolor pencils. The ribbon is from May Arts. Simple and lovely.
 What is more fun than a cheery bunny birthday greeting? This cute bunny is from The Cat's Pajamas and I love this little guy (or maybe girl). Actually, given the hair bow (no pun intended), I would guess this one is a girl! Anyway, stamped with Momento and colored with Copics. Then cut out. I cut out two Spellbinders labels - one with brown Bazzill cardstock and the other with a BoBunny Double-Dot Designs - of course I had to use BoBunny paper! I went around the border of the smaller piece with a white Viva Pearl Pen. Add some layers and a punched border from an EK border punch and you have a wonderful card!
 A fun little project that can be highly customized for any special recipient.
 This is another fun Penny Black Halloween stamp - a nice spooky tree. I stamped the tree image, then cut the cardstock out with a Spellbinders die. To create the moon, I punched out a circle and placed it in the upper right corner as a mask, then sponged Ranger's Distress ink - Pumice Stone to create a grey sky background. I stamped the tree again on another piece of cardstock and cut out all the little "ornaments" hanging from the tree and colored them with Copic markers. Then they are attached to the card with foam tape to add a little dimension. The base card is an orange Bazzill card with a striped DP at the top and bottom. Lastly I added some crystal Stickles for a little glitz!
 Cupcakes are all the rage and Halloween is no exception! This card was made with a fun set from Penny Black. The background cardstock is cut with a Spellbinders scallop rectangle die, then the edges are colored with Ranger Distress ink in Frayed Burlap before the cardstock is removed from the die. The base of the cupcake is stamped on the base cardstock. Next you stamp 2 different cupcake tops on a 2nd piece of cardstock and color with a foam dauber and Ranger Distress ink - Orange Marmalade. Cut out and attached over the cupcake base and adorned with the little bats and candy corn. Stamp and cut out the Halloween banner and attach so it looks like it is sticking out of the cupcake. Add that to a couple color layers and you're done!
 This is one of the great images from the "Blizzard Bunch" stamp set from JustRite Stampers. He's stamped with Momento ink and colored with Copic markers. I layered the oval to a Spellbinders Labels Ten die. I used a Tonic holly punch to add a little trim to the design and some gold self-adhesive pearls to the Labels Ten die. The base card is a BoBunny double-dot cardstock, then added the presents paper by Little Yellow Bicycle and trimmed it with some gold cardstock - one edge cut with an EK border punch. Then add some brown lace trim by May Arts and 3 punched snowflakes with a Martha Stewart punch and some red circles added to the center. It's 80 degrees outside right now and it is hard to think about snow, but we all know it is coming!
 This card uses another fun A La Mode set from My Favorite Things! I stamped the image and colored her with Copics. I used a Spellbinders die to create something that kinda looks like a coffee cup lid and stamped that with the "Miss You a Latte" saying - which is part of the stamp set. The DP is from BoBunny. Very cheery paper - which is what we need here in the Northeast, as it continues to rain. We're considering building an ark! I punched a couple different flower punch pieces and layered them together and lastly added a few pink pearls.


 I think my favorite is Autumn Marci, but I also really like Lil' Rocker Luka and Angel Marci!
 Back around Mother's Day, I made a similar card. Today I needed a quick birthday card and started with the same basic idea - however on this one I stamped it with Momento ink and colored with Copics - using a color with more of a salmon pink vice true pink. I also opted to layer the pink part of the card to a green card, which allowed me to wrap the bow instead of just tying a bow and attaching it. I added the "happy birthday" image to the large Penny Black image, then stamped a birthday verse on the inside.
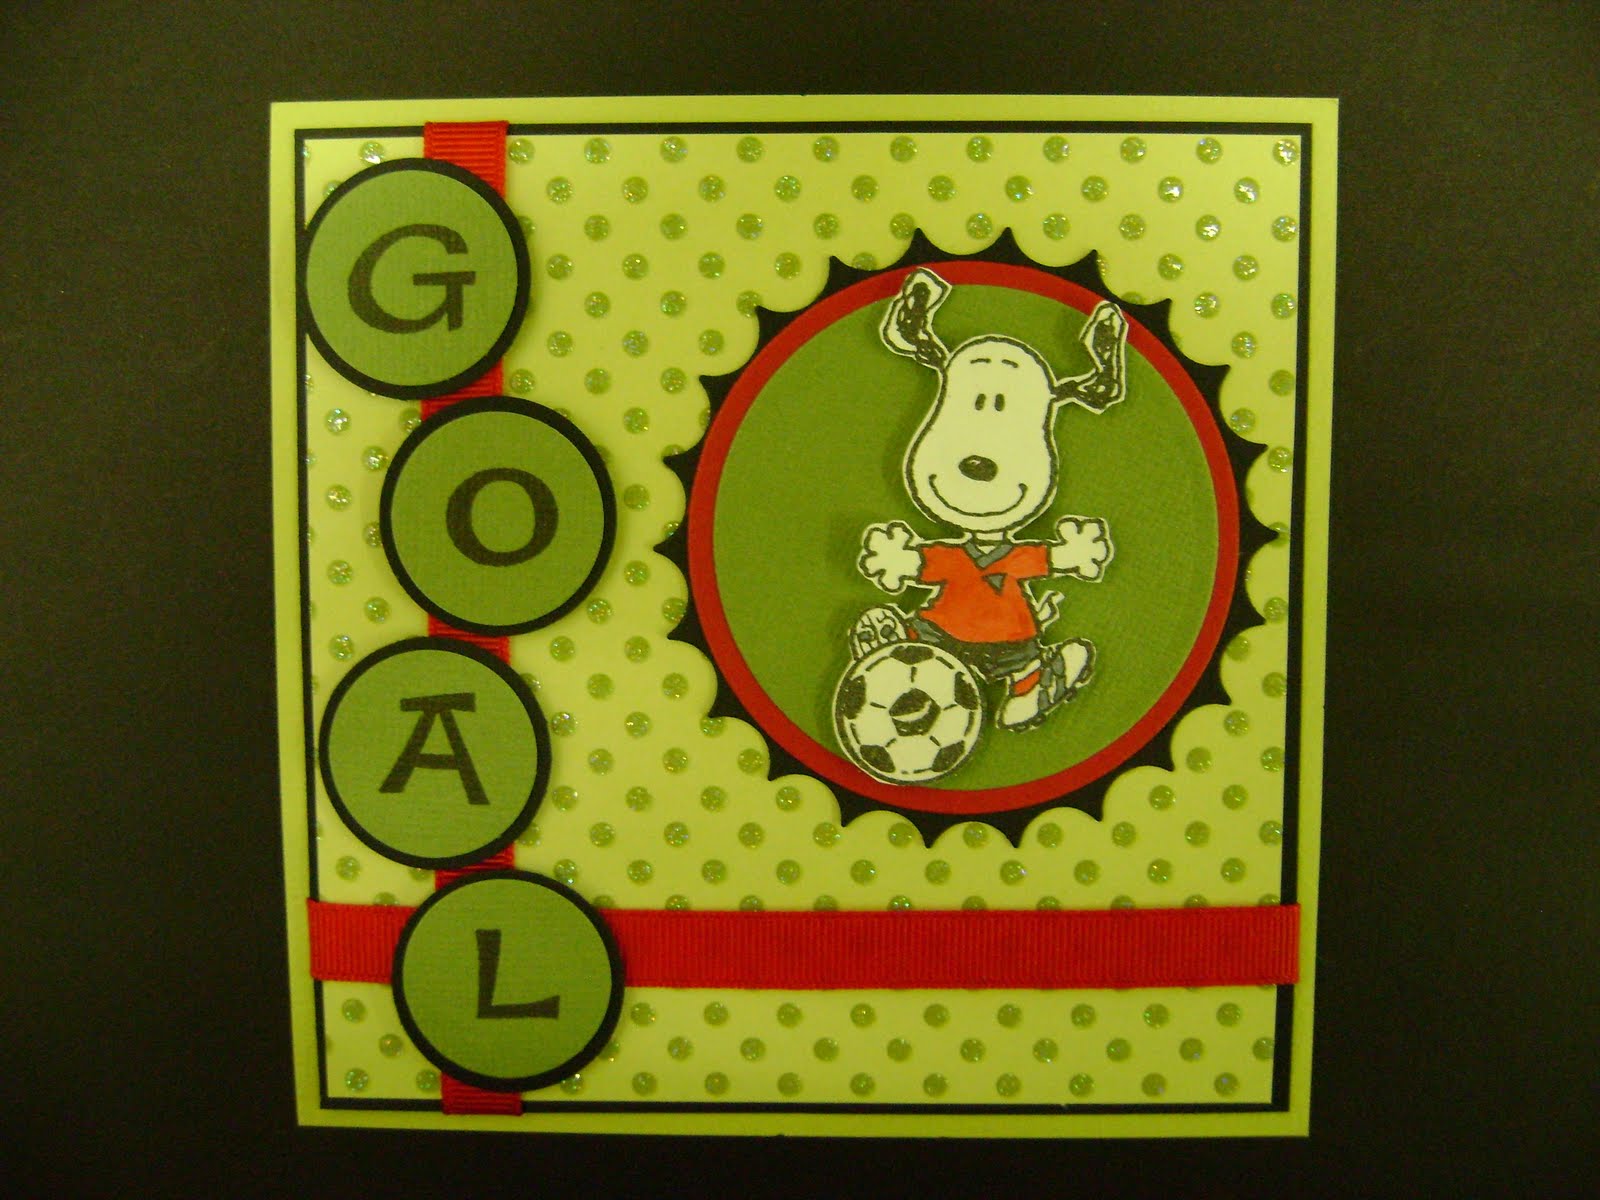 This is the last of 3 Peanuts sports cards I created. Here we feature Snoopy playing soccer. I stamped Snoopy with black Momento ink and colored him with Copic markers. Then I cut him out and layered him to a circle cut with a Spellbinders die and trimmed with a reverse scallop die. I stamped the letters for the word GOAL from a Cat's Pajama's alphabet set then punched them out with a circle die. Add some red grosgrain ribbon and some layers (I used a glitter dotted cardstock from Best Creations) and you have a fun little card.
 I needed to make a wedding card and reached for a couple stamps from Penny Black. I chose the wedding couple and stamped it with black Versafine ink and colored the image with watercolor pencils and a blender pen. I added some pearl Twinking H20s on the gown and cut out the image with a Spellbinders oval die. Layered that to a scallop oval cut from a blue Bazzill Bling cardstock. I used a white Bazzill bling, cut 2 pieces to fit together and embossed them with 2 different Cuttlebug embossing folders. Then I layered them together and used a silver and blue ribbon to cover the edge. Add the wording (also by Penny Black), a bow and a couple silver pearls and you're done!
 This is a card that can be for a variety of celebrations - not just a birthday. I used the main image from one My Favorite Things A La Mode set and the words from another one. I thought that the words went well together. The image is stamped with black Momento ink and colored with Copic markers. I stamped the words on the edge of a square-ish Spellbinders die and attached that to the side of the striped layer of cardstock. I used a combination of mini rick rack and ribbon for embellishment and added a single bow, as well. Very girlie, but a fun little card!
 I needed to make a card that would hold a gift card for a birthday. Art Impressions came out with a line of stamps for just this purpose. I adore this lady - I am convinced that I will look like her in about 20 years! I stamped her on white cardstock, colored her with Prismacolor pencils and cut her out. Then I stamped the image again on DP and cut out just her top and glued it over the white image. I like to use a thin line of Ranger's Glossy Accents for this type of gluing - it has never failed me! I stamped the gift box image on the striped paper and cut it out. Stamped it again on Bazzill Tink Pink and cut out the bow and ribbon and glued it over the striped image. I cut out the blue dot paper (from Melissa Frances) and started to assemble. First I glued my lady down at the top of the blue dot paper with Glossy Accents. Next, I glued down the top of the package - positioning it so she looks like she is behind the box. I placed the lower box below (no glue) and put 2 small pencils marks the width of the box. I removed the box bottom and used an exacto knife to cut a slit between the dots (I cut 2 lines a snitch apart to create a small opening). Then I glued down the box bottom - carefully placing it just below the bottom of my slot. I layered this to the piece of black cardstock - applying 1/8" adhesive (I used 1/8" Scor-tape) so that the gift card would stop at the bottom. I stamped the words below the package and completed the cards. For the last little detail, I put 2 pink adhesive pearls on her ears for earrings! Hey, a girl has got to look good!
 How can you be spooked with this cute little cat? This is an image from Whippersnapper rubber stamps - I love their cute designs. Stamped with Momento ink and colored with Copic markers. Then I cut the image out with a Spellbinders Lacey Oval die - and added some Ranger Wild Honey Distress ink around the edge of the die before removing the cardstock from the die. Layered up with a couple other Spellbinders dies in orange and black - with a few purple glitter brads from Doodlebug. The ribbon is a crinkle crepe ribbon from Creative Impressions - I LOVE this ribbon. Lastly I added some fun words from Memory Box with silver Encore ink from Tsukineko.
 This card uses a great dog image from Whippersnapper Designs stamps and some fun layering to make a great masculine birthday card. The dog image is colored with watercolor pencils and a blender pen and layered with coordinating DP and Bazzill cardstock - adding a layer punched with an EK pawprint border punch. Add a few brads and you have a great card!
 Yep, Charlie Brown is one of our all-time favorite underdogs and he is at it on the pitching mound in this card! This is another great Peanuts stamp from Stampabilities. I stamped the image with black Memento ink and colored it with Copic markers. I cut it out with a cicrle Spellbinders die, added a second straight circle in black for highlights, then added a red scallop circle. I used a couple coordinating papers and a green strip cut with an EK border punch. I used a word stamp from Great Impressions and added some black dew drops in the corners for accent.
 This card was made with the Butterfly Garden set from JustRite Stampers. I stamped and embossed the image with white embossing powder on vellum - then colored the image from the back with Copic markers. Copics work great on vellum because they dry quickly. I then took one of the borders and stamped it with Colorbox Aqua pigment ink on white cardstock and cut it out in a frame with 2 Spellbinder circle dies. Next I used the new Spellbinders Picot Edge circle die set (LOVE these!) and layered the butterfly piece to that. I placed it on a yellow card with a DP from Memory Box - very delicate design and perfect for this card. I used a couple crinkle ribbon from Creative Impressions and did a double-thickness bow out of the light blue ribbon. This ribbon ties like a dream! Add a few pearls in the corner and you're done!
 In honor of the US Open Tennis Tournament how going on in Flushing Meadow, NY, today I'll show a fun little card with Snoopy plating tennis. These Peanut stamps have been VERY popular - with all ages. I stamped the image with Momento ink and colored him with Copic markers. Cut the image out with a circle Spellbinders and did a coordinating color layer and a scallop layer, then added a little happy birthday image cut out in a circle (like a tennis ball) and added that and some ribbon. A simple card, but a good one to have in your stash!