These new dies from Spellbinders will be coming soon to Stamped Designs - and only Stamped Designs and other Crafter's Home stores. They will be available in non-Crafter's Home stores starting in late July. I don't have an actual ship date, but they will be featured in a Spellbinders blog hop later in May.
Get ready for some fun dies!
Jeannette
Wednesday, April 27, 2011
Tuesday, April 26, 2011
EK Border Punch Storage
My Mom discovered a very effective way to store the EK Success border punches. We have a lot of the 6-drawer Iris chests in the shop - a LOT! We store a lot of class supplies in them. We love the EK border punches because they fold and lock and will punch through Bazzill cardstock without breaking. Well, she discovered that you can stand them on edge (with the little label pointing up) in the drawers, saving a lot of space! Yes, there are a couple rogue Stampin' Up punches in the back, but they will likely get relocated as we add more punches.
So, if you have these drawers in your stamping storage collection, this is a great space saver!
Thanks for making us part of your day today!
Jeannette
Correction!
I slipped up when I gave the company name for the plaid cardstock used on the little tote bags in the previous post. It is made by We R Memory Keepers. Sorry for the goof!
Jeannette
Jeannette
Sunday, April 24, 2011
Easter Treat Tote Bags
I made these little treat bags that look like the famous boat tote bags that are very New England. Of course, these have an Easter twist. Die Cuts With A View came out with this great plaid cardstock for the holiday and I used that as the trim on the bags with 3 different colors of Bazzill cardstock. Fill them up with some candy treats and you're ready to go!
Happy Easter everyone!
Jeannette
Saturday, April 23, 2011
Last Minute Easter Card....
I am sure I am not the only one out there working on last-minute Easter cards! This is one that I can give personally tomorrow, so I am all set! I used a clear set from Stampendous with a couple elegant eggs (it also has a gorgeous butterfly). I stamped the eggs with Onyx Black Versafine ink, then embossed with clear embossing powder. You have to be quick with VersaFine when embossing, as the ink is designed to dry quickly. Then I colored the eggs with Copic markers - colors are shown below. The words are by Penny Black and I added a white satin ribbon down the side. This is an A-6 card (folded card measures 4-1/2 x 6-1/4"). A-6 cards are a great size - sometimes the standard A-2 cards are just a little too small and the A-6 is perfect. The pink dotted cardstock is BoBunny Double Dot (of course!). The rest of the layers are classic Bazzill cardstock.
These are the colors I used for coloring the eggs on the card. I chose to leave the main part of the egg white, as I thought it gave a little more contrast.
Thanks for stopping by today. I should have another post later today if I get all my Easter prep stuff done to show you!
These are the colors I used for coloring the eggs on the card. I chose to leave the main part of the egg white, as I thought it gave a little more contrast.
Thanks for stopping by today. I should have another post later today if I get all my Easter prep stuff done to show you!
Jeannette
Wednesday, April 20, 2011
Coloring glitter with Copics!
I cannot take credit for this card, as it was sent to me as a sample from Elizabeth Crafts Glitter. However, it does show how you can successfully color glitter with Copic markers. As you know, Copics are alcohol based, which means that they will dry on non-porous surfaces (which includes glitter). In this case, they started with the clear "highlites" glitter. All of the color is from the markers. Now, there are a couple things you need to pay attention to. The glitter can get into your marker tip - you want to use GENTLE pressure with the markers to reduce this as much as possible. You should be able to get the glitter off by running the tip on a piece of paper. Worst case, you can always replace the tip.
Just ANOTHER use for your Copics!
Jeannette
Sunday, April 17, 2011
Gone Fishin'!
I needed to make a retirement card and I know that the guy likes to fish, so when I saw the Fishing Riley stamp on my shelf, I knew it could make the perfect card. I stamped Riley with black VersaFine ink and colored him with Staedtler watercolor pencils and a Dove Blender pen. I used a BoBunny stripe and double dot cardstock for layers and added a blue strip cut with an EK Success border punch. The words are from Impression Obsession. I added a few antique copper brads and a card is born! Relatively quick and easy. I actually made the identical card with a birthday sentiment for another person's birthday, as it is almost as quick to make 2 cards as one.
Thanks for stopping by! Jeannette
Friday, April 15, 2011
A Bluejay from StacyStamps
This card and image is from StacyStamps! Stacy has 4 beautiful bird images - very realistic and well-drawn. Most people either love or hate blue jays! I happen to like them - my cats do not. We throw peanuts on our back deck for the blue jays and a few other birds who will pick them up and fly to a tree to bust into the shell for the treat. The cats go wild, because the jays tend to come in a group - as many as 10 and they line up on the railing and torment the cats for 20-30 minutes. Stay tuned for more bird cards!
Jeannette
Tuesday, April 12, 2011
Another Easter Card...
This is another bunny card using a stamp from Northwoods Rubber Stamps. Cute bunnies in a circle. These were colored with watercolor pencils and a Dove blender. I added a scallop circle under the bunnies - cut from a Spellbinders Classic Scallop Circles die using a swiss dot cardstock from Bazzill. The pink layer is one of the new BoBunny Double Dot Designs cardstock. This is the smaller swirl design - which was perfect for this card. I added some adhesive pearls in the corners.
Thanks for stopping by! Jeannette
Sunday, April 10, 2011
Flowers with Elizabeth Crafts Glitter...
This flower card was made with "peel-off" stickers and the amazing glitter from Elizabeth Crafts Design. The technique is fairly easy, once you know a couple simple tricks and it makes a stunning card that keeps people guessing how you did it. The glitter is so fine that it does not even feel like glitter when you're done - it feels something like velvet.
We have a glitter class coming up at the end of the month where we will be making a card similar to this one and a couple other cards.
Thanks for checking out the blog today! Jeannette
Friday, April 8, 2011
Baskets of Bunnies...
Here's another fun Easter card using stamps from Northwoods Rubber Stamps. These little bunnies in baskets are great fun and make a cute Easter card. The images are stamped in VersaFine ink and colored with watercolor pencils and a Dove blender pen. I used blue chalk to create a more sky-like background around the bunnies. Underneath the stamped images are 4 colors of BoBunny double dot cardstock in a tile pattern. The words above the bunnies are also a Northwoods stamp that is stamped, colored, cut out and layered with foam tape.
Thanks for stopping by! Jeannette
Thursday, April 7, 2011
La-La Land Crafts Stamps Now at Stamped Designs!
We got in our first shipment of stamps from La-La Land Crafts! These are fun images that I think a lot of you will enjoy working with. There are several "characters" and they are great for coloring with Copic markers. And, speaking of Copics, the HUGE Copic order came yesterday - including the 12 new colors of Sketch markers and the new Ciao markers (not new ink colors, but 36 colors now available in Ciao that were previously only available in Sketch). So, stop by and check out the new La-La Land stamps and pick up some new Copic markers!
Jeannette
This is supposed to be the 6 AM departure...
Well, everything seemed to be going okay - we boarded the plane and pushed back on time. Then we heard those fateful words that strike fear into any seasoned air traveler, "Folks, we have a maintenance issue." Not able to be fixed easily, so we went back to the terminal. Now we are all waiting for later flights. Nothing like some fun travel adventures to start the weekend!
Jeannette
Wednesday, April 6, 2011
Easter Lily Card
Who doesn't love the white Easter lily? They are such a majestic looking flower. This is a very simple, yet effective card. The Northwoods lily stamp is stamped with black VersaFine ink and colored with watercolor pencils and a blender pen. I think I might have put a tad too much yellow on the flowers. You then cut out the right side of it - which is really the hardest part of the card and attach it to the Celtic Eyes Bazzill dotted swiss cardstock.Add a few layers and a wording by Penny Black and you have a relatively simple Easter card.
Thanks for making us a part of your day today! Jeannette
Sunday, April 3, 2011
Whippersnapper Snowman...
We started doing a Christmas class every month at the store and the response has been incredible! I think everyone likes the idea of getting a bunch of Christmas cards done throughout the year so that the holiday season is not so stressful.
This card is using a great snowman image from Whippersnapper Designs. The little bluebirds add a great dimension to the image. The Merry Christmas image is from a JustRite Stampers set. I stamped the image with VersaFine ink and colored it with watercolor pencils and a blender pen. Added a couple layers and used the Spellbinders Lacey Squares die. I love the lacey dies - and now we have ovals! I punched 4 snowflakes from a glitter cardstock and added them to the corners. Instead of pearls, I used a blue Viva Pearl Pen in the center of the snowflakes.
Hope you had an enjoyable weekend!
Jeannette
Saturday, April 2, 2011
She's Gone to the Grunge Side...
As many of you know, my mom has never been able to embrace the grunge look. Just wasn't her thing and she opted for the more traditional stamping style. Last weekend we were at a wholesale show in Massachusetts. Ranger was there with Tim Holtz. Saturday night there is a sample making frenzy where the vendors have make and takes for the stores to make. Tim had created a chocolate bunny pin using Ultra Thick Embossing Enamel and one of his embellishments. I made one and showed it to my mom about halfway through the event. When I met up with her later, she had gone over and made one. So, it started with this:
And ended up with this:
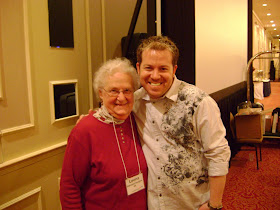
So I guess we can say she is grunge's most recent convert!
Have a great day! Jeannette